
Troubled with a leaking shower faucet or faulty temperature control? There’s no need to call a plumber just yet. Installing the shower faucet is actually not that difficult. Most homeowners can change a shower faucet on their own to save on labor fees.
When purchasing a new shower faucet, keep in mind the measurements and style of the one needed to be installed. It is easier to install or change a shower faucet when the style is the same and the measurements are accurate.
Basic Styles
Table of Contents
Faucets basically have three styles: Single-handled faucets have one handle to control the temperature and water flow. Two-handled faucets have different handles for hot and cold water temperature while three-handled faucets have three handles to control hot and cold water and divert the water to the showerhead.
Tools Needed
Aside from the new faucet parts, there are only a few tools needed to change a shower faucet. Prepare a small flathead screwdriver, a Phillips screwdriver, a pair of Slip-jaw pliers and an adjustable wrench. For those with two-handled and three-handled faucets, also prepare some petroleum jelly and Teflon tape.
Step 1: Turn off Water Supply
Turn off the valve or main water supply then turn on the faucet to drain the water in the pipes. Lay out all the faucet handle parts and tools needed for easy access and cover the drain to keep the screws and small parts from falling inside.
Step 2: Remove the Plastic Cover
Nudge the tip of a small flathead screwdriver into the plastic cover on top of the faucet handle. Pop off that cover. If you are dealing with a two-handled or three-handled faucet, repeat the process to the other faucet handle(s).
It Might Be Helpful:
How to Replace a Toilet Flapper – The DIY Strategies!
How To Increase Shower Head Water Pressure
How to Install a Shower Drain – DIY Guide
Step 3: Remove the Handle
Locate the screw inside the faucet handle. Using a Phillips screwdriver, rotate the screw counterclockwise while securing the handle with the other hand. When the screw is removed, pull it out from the mount together with the faucet handle. Remove the other faucet handle(s) the same way.
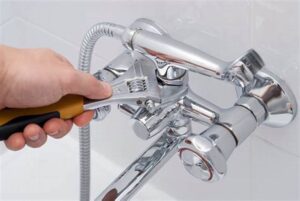
Step 4: Remove the Cartridge or Faucet
Look for the retainer clip or metal ring on top of the cartridge housing. Use an adjustable wrench to loosen and remove the clip slowly. Be careful not to lose this piece. Grasp the tip of the shower faucet with using a pair of slip-jaw pliers. Remove the shower faucet or cartridge straight from the valve in the wall.
Step 5: Change the Stem
This is for two-handled and three handled faucet, for single-handled type, proceed to step 7.
On two-handled and three handled faucets, there will be a mechanism or stem that can change the water temperature. This mechanism or stem is composed of rubber seals and threaded handle that can open and close water lines.
The stem is usually located in the second faucet. With the use of pliers, turn the stem in a counterclockwise direction. Remove the screw and change the washer and O-ring to a new one. The new washer and O-ring must be coated with petroleum jelly. Install the new stem in the same position.
Step 6: Change the Water Diverter
If the faucet is a single-handled or a two-handled type, proceed to step 7.
For, three-handled faucet, the diverter is usually located in the third handle. Remove the old valve with the use of the wrench. Wrap some Teflon tape on the threads of the valve.
Make sure to leave some threads bare to ensure an easy grip. Put in the new the new diverter. After it is tightly secured, give it an extra quarter turn but do not force it.
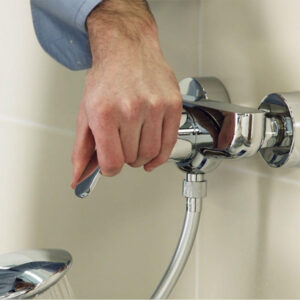
Step 7: Change the Shower Faucet
In the open valve, put on the new shower faucet. Secure it by putting back the retaining clip or metal ring which was removed earlier Tighten using the adjustable wrench.
Step 8: Replace the Handle
Mount the new handles on the same locations and tighten it with the screws. Place the new plastic covering over the handles. Make sure everything is secured.
Step 9: Test the Shower Faucet
Turn on the water supply to test the new shower faucet. It is very important to turn off the valve or the entire water supply of the entire house before changing the shower faucet.
If not, it could cause some damage to the walls behind the faucet. After it’s done, turn on all the taps in the house to force out excess air that may have gotten in the pipes.
Bottom Line
See? Even a DIY newbie can change a shower faucet easily if the steps above are followed. The duration of the process might vary from 15 minutes to a couple of hours depending on plumbing experience, nimbleness of the hands and the type of shower faucet.
Remember to look over the manufacturer’s instructions if there is any. Some shower faucets may have additional small beads used for caulking based on the manufacturer.