A toilet seal might be a small but vital thing in the bathroom. It is made of the wax ring and is usually located at the bottom of every toilet. Lose or broken seals are the common reasons why you might have a leaking toilet. In most bathrooms, the seal is ring-shaped with a modifiable collar for tighter fixing.
Every toilet must have this seal to hinder some leakage of water as well as the sewer gases that might lead to pollution of your bathroom space.
Usually, the best toilet seal lasts forever, but there are times when you will need to replace the wax ring. The best thing is, seal replacement is the easiest task you can carry out in your home. You do not have to hire someone to come and do the replacement for you. If you are asking yourself how you can replace the toilet seal at your home, here are simple, undemanding and affordable tips to help you out.
Replacing your toilet seal in just four steps:
Get Started
Table of Contents
You need to start by getting yourself a pair of gloves, preferably the rubber gloves. You need to turn off the main valve in order to stop water from flowing into your toilet.
The toilet flush valve is usually located on the wall tank where the cistern of a toiled is protected. You should make sure that there is no water left in the toilet by flushing the toilet. Next is proceeding to the base of the bathroom, the place where a toilet is connected to the bathroom floor.
Use a screwdriver to remove the ring of the caulk, ensure that the screwdriver that you are using has a flat head. It might be a tiresome task because a toilet base is tightly fixed during the installation process.
In opening the plastic caps that are found on all sides of the toilet base, you must use the tip of the screwdriver. Make sure you loosen then remove the bolts that are located below the caps.
Don’t Miss To Read: Best Toilet Lock – Our Top Selections [2021]
Disassemble the Toilet Flange
It will be excellent if you seek some help from a second party who will help you in lifting as well as holding the toilet bowl. There are other moments when the toilet bowl is not adequately secured at the base and untying a flange might lead to a sudden fall.
Spreading some old clothes around the base of your toilet before you start tilting the bowl. Let your helper be the one tilting the bowl slowly.
Tilting of the bowl might lead to spurge of some water that could be left in the bowl when flashing. Hence, the clothes should help you in making sure that the water does not spread all over the floor.
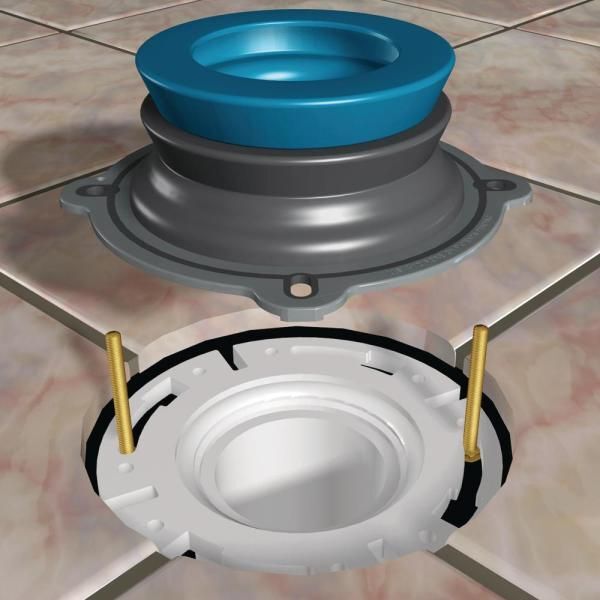
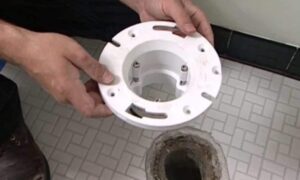
After removing the bowl, you should be able to see the flange bolt with some nuts. The flange is used for securing a toilet bowl in the underlying sewer hole.
Note that: Flanges are made of different materials, such as plastic and cast iron.
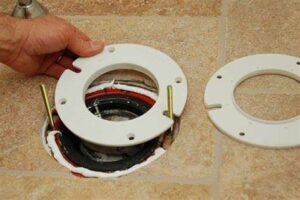
A metal flange might be difficult for you to handle since it could have corroded for the period it was fixed. If this happens to your flange, make sure you use a sharp edge of the screwdriver to do scrape out the rust. Use a wrench when loosening the nut in order to remove the bolt.
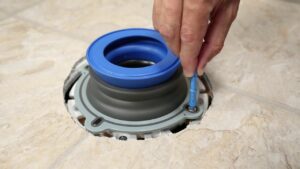
Replace the Toilet Seal
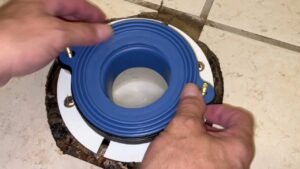
It is suggested for you to ask your helper to keep the bowl tilted as you continue with another repair process since removing it might be difficult for you when doing the re-adjustment. You can use a putty knife, to edge-out the hoary wax ring.
Replace it with a new one. Ensure the wax ring fits tightly. It is because the novel wax ring tends to overhang a bit, which might affect the tight fitting. You need to press down on the seal continually. You may now proceed with the insertion of the flange bolts. Use a wrench when tightening the bolts.
Wrapping-up Toilet Seal Restoration
You may now ask your helper to moderately place the toilet bowl back to its original spot. You should never do this with a jerk since it might lead to the cracking of the underlying clay tiles on the floor of your bathroom. Attach the metal bolts to secure your toilet bowl on the floor and constrict them using a wrench.
Place back the plastic caps that you removed at the beginning of your repair. The last thing to do is applying a thin droplet of seal around the base of your toilet for tighter fitting.
You may now turn on the water supply regulator to your toilet for use. You may now use your toilet with no worries after following all the procedures.
Final Verdict
Toilet seal replacement is the best and simplest project you can do at your home. You will take the least time possible if you have everything that you will need ready. This is a task that most people love most because any gender can do it with the procedures.
Following the four easy steps above, you will gain a lot of knowledge when it comes to your toilet. They do not only help you in seal replacement but also offer you some information about the toilet. The plan will not take a lot of your time like any other home project that you might get involved in.