
The composting toilet is one of the simplest and cheapest ways to recycle solid waste and save money at the same time. It’s great for those interested in gardening and environmentalism or who want to live green.
This is a very simple but effective composting toilet. It requires no electricity or other special equipment, and you can build it in under an hour.
It works by allowing wastewater to flow into a chamber where it’s mixed with oxygen and bacteria to create compost. The compost is then used to fertilize the garden.
You can use this method to compost almost anything that you wouldn’t want to throw away, including food waste, kitchen scraps, animal manure, and even human waste.
Table of Contents
-
- What Is A Composting Toilet?
- Types Of DIY Compost Toilet
- How Does A Composting Toilet Work?
- Tips for Making Your Own Composting Toilet
- Build The Box
- Add Comfortable Holes
- Drill Hole For A Toilet Seat
- Create Legs For The Plywood
- Set The Frame On Its Legs
- Install The Toilet Seat
- Attach The Water Supply Lines
- Add The Urine Separator
- Get The Buckets
- Conclusion
What Is A Composting Toilet?
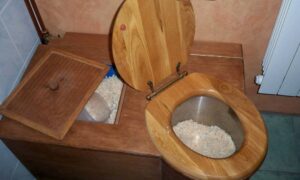
A composting toilet is simply a toilet designed to allow water and waste to be processed into rich compost. There are several different designs available. They are usually inexpensive and easy to build.
Most composting toilets are simple structures that are made out of wood. They may be designed as a pit or pitless toilet and can be made using scrap lumber or pallets. They are easy to build, easy to clean, and cheap to purchase.
The composting toilet is a great way to reduce waste and save money. You can use the compost to fertilize your garden and plant food crops.
Types Of DIY Compost Toilet
It would help if you also built composting toilets to live a greener lifestyle. These composting toilets are very popular because they are affordable and easy to build. The composting toilet is a great alternative to a regular toilet. Moreover, it is an ideal way to conserve natural resources. This is because these toilets are made from recycled materials.
Self-Contained Homemade Toilet
You can build a self-contained homemade toilet. The toilet should be installed next to the back wall of your house so that it doesn’t get blocked by leaves and debris. The toilet consists of two chambers: The first one holds the urine while the second one collects the solid waste. In addition, there are two valves that must be connected in order for the toilet to operate properly.
There are also two holes near the bottom of the toilet. These holes allow water to enter the toilet so that the bacteria that help decompose the waste can easily enter the soil. You can connect the pipes to the bathroom with PVC tubing. If you want to use the toilet, remove the lid first.
Central/Remote Homemade Toilet
Install a central or remote toilet using PVC piping and flexible connectors. There are many advantages of installing a central/remote homemade toilet. First, it is easy to build. You can build it by yourself. You don’t need to hire a contractor. Second, it is cheaper than purchasing a ready-made toilet.
Third, it is more eco-friendly. The energy that goes into building a toilet is less than the energy used to buy one. Fourth, it is safer. You can’t have problems like leaks if you build a toilet by yourself. Fifth, it has fewer chances of being vandalized. Since you built it yourself, nobody can vandalize it. Sixth, you can easily clean it.
How Does A Composting Toilet Work?
In a composting toilet, the waste separates into a liquid part and a solid part, then those parts are mixed with wood chips or other kinds of absorbent materials that turn the mix into compost.
When you build a composting toilet, you are creating a natural environment. In nature, the organic matter goes through a process called decomposition. This process occurs when microorganisms eat organic matter and release nutrients into the soil. You are taking advantage of this process when you build a composting toilet.
You create an environment that encourages the growth of the right kind of organisms. You are providing them with the food that they need. You provide them with the oxygen that they need to grow and thrive. All these factors result in an environment that is safe for them. After the right kind of organisms has grown, they turn the food they have eaten into a material called compost.
Tips for Making Your Own Composting Toilet
If you are planning to build your own composting toilet, you should first figure out what you want to use it for. For example, you could use it for making garden soil, and you could even make a backyard kitchen garden. Building a composting toilet is a great way to reduce your family’s garbage and save money. Composting toilets allows the solids from human waste to decompose and turn into fertilizer.
You can build a composting toilet using simple materials. Materials include wood, concrete, metal, and plastic, but you can also make a composting toilet using bricks, sand, soil, and so on.
If you are interested in building a composting toilet, you will need a couple of days to plan the project. After that, it will take about three hours to finish building the bathroom. You can use scrap lumber or pallets for your composting toilet. You’ll have to cut them down to size if you use pallets. If you use scrap lumber, you can tear it apart. It doesn’t have to be perfect. It only has to be strong enough to support the toilet bowl.
The main challenge of building a composting toilet is finding a place to store the compost once you’ve created it. You can also make composting toilets that are self-contained and self-cleaning. These require a separate tank to keep the compost, added periodically and cleaned out when necessary.
Composting toilets also work well in rural areas, where there aren’t many opportunities to dispose of solid waste. Here are some common steps to build a composting toilet within a short time.
Gather Your Materials & Tools
- 12mm plywood
- 4 2×4 planks of wood
- Screws/Screwdriver
- Wood glue
- Pocket hole jig
- Drill bits
- Handheld jigsaw
- Electric drill
- Woodworking file
- Sandpaper
- Bucket
- Toilet seat
Build The Box
The first thing to do is to build a box to hold the toilet. You can make your box using wood scraps or by ripping down 12mm plywood. You should make sure that the box is sturdy and solid. After you have finished building the box, add the screws to it.
You must screw the box tightly so it can stand on its own. Then, use the pocket hole jig to drill the holes for the wood screws. To make the pockets, you can use a handheld jigsaw. Before you start making the toilet itself, you must ensure you have all the materials and tools you will need.
Add Comfortable Holes
Once you have finished building the box, it is time to add comfortable holes. Use your pocket hole jig to drill the holes in the side panels. Make sure that you use the correct size for each hole. After that, use your pocket hole jig to make the holes in the back. You may need to cut out the back piece to drill the holes for the back. Next, use your router and a table saw to make a template from the front panel. Use the same template to make a template for the lid. You can then add the holes for the lids using your router and a circular saw. Finally, it’s time to assemble the toilet.
Drill Hole For A Toilet Seat
Drill a hole in the bottom of the seat with the right size hole for the toilet. Then cut the seat to length. Next, drill a hole for the bolts. The bolt hole should be located over the hole for the toilet.
You may need to make the holes for the toilet seat and the lid. Use a jigsaw to make the holes in the lid. You should first make the template for the lid. Then, use a table saw, and a circular saw to cut the lid. Use the template to make the holes for the bolts. Place the toilet in the position you want. Attach the bolts. Finally, attach the lid.
Create Legs For The Plywood
It is possible to create legs for the plywood by using a jigsaw, and a table saw. However, you should first make a template for the plywood. You can use wood strips and tape to make the template. It is important to make sure that the template has no rough edges.
Use a pencil to draw circles on the wood strips. These circles will represent the circular holes for the screws. Draw lines on the wood strips to connect the circles. Then, use the template to cut the plywood. Use the table saw to cut along the lines. Finally, use the jigsaw to make the holes in the plywood.
Set The Frame On Its Legs
The legs of the frame should be set on the plywood and then screwed together. Make sure that the legs are perpendicular to the frame. The structure should be assembled using one screw in each corner. Don’t use more than two screws. Make sure that the screws go all the way through the legs. You will need to drill a hole in each leg. The hole should be large enough to accommodate a washer.
Install The Toilet Seat
Use the plumber’s putty to attach the toilet seat to the back of the frame. The screws should be placed inside the legs. Do not over-tighten the screws. You will need to tighten them only enough to keep the toilet seat from coming off of the frame.
Use the screwdriver to install the bolts into the front corners of the frame. Don’t over-tighten them. The bolts should be placed over the holes.
Composting Toilet DIY Guide
Attach The Water Supply Lines
Use the wrench to attach the water supply lines to the frame. The water supply lines should be attached to the side of the tank. Use the pipe wrench to install the first pipe. Remove the old pipe. Be sure to make sure that the new pipe fits tightly into the old pipe.
The new pipe will connect to the old pipe. Use the second pipe wrench to attach the second pipe. Make sure that it fits snugly into the first pipe. The second pipe should connect to the first one. There is no need to attach the pipes. The water supply lines will join the pipes together.
Add The Urine Separator
A urinal separator will protect you from getting an infection. When you add the urine separator, you can eliminate the problem of a toilet overflowing. A urine separator is a device that will prevent an overflowing toilet from contaminating the rest of the bathroom.
A urine separator is usually placed under the toilet tank. Toilet tanks are usually made of plastic. The urine separator is connected to the overflow pipe of the toilet. The overflow pipe is connected to the drain. When the toilet tank overflows, the water flows into the urine separator. The urine separator will be filled with water. When the water reaches a certain level, it will soak.
Get The Buckets
You don’t have to clean your toilet if it overflows. There are ways to get rid of the overflow. One way is to install a toilet bucket. This is a bucket that is placed under the toilet tank. It can hold about 1 gallon of water. The overflow water from the toilet goes into the bucket. The bucket will be filled and emptied.
When the water reaches a certain level, it will overflow into the sewer. When the toilet overflows, you should empty the bucket. This will help you to reduce waste. It’s recommended that you do this once a month. When you do this, you will be able to save money. If you don’t have a bucket, you should get one.
Conclusion
Building a composting toilet is no harder than other home projects if you are up to the task. You can easily build a composting toilet using our step-by-step DIY guide.
Composting toilets are safe, odorless, and environmentally friendly, saving you your hard-earned money.